I'm not a huge fan of winter but I must say there are a handful of things that I look forward to at this time of year- Firstly, fluffy socks. Did you know there's a psychologist in Berlin who claims fluffy socks can mend a broken heart? True Story. Elisabeth Stoffel-Laeufer counsels people who have suffered a break-up in Freiburg, south-western Germany and the first thing her broken-hearted patients must do is take off their shoes and put on fluffy warm socks. I totally agree with her theory- fluffy socks make the world a better place and they certainly make winter more bearable. Secondly, winter sun. I love waking up to a bedroom that's beaming with yellow winter sun or thawing in its warmth with a good book on a Sunday afternoon. Lastly, Soup. There's a reason why a book was once entitled "Chicken Soup for the Soul" - because soup IS for the soul, its therapeutic, its happiness in liquid form!
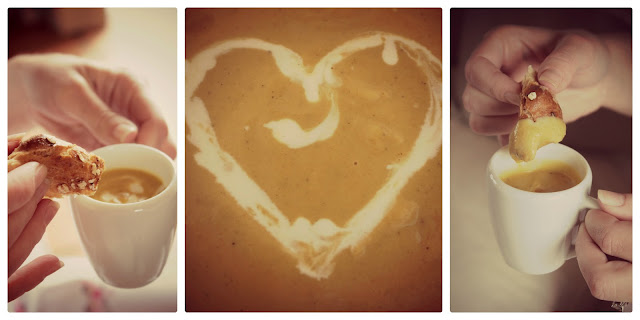
I've decided to share a little more about my love of soup as I made it for some friends the other day. It was the perfect starter for a freezing night. Actually, it wasn't a starter...it was more of an Amuse Bouche! My friends laughed at me when I tried to pronounce this word, in fact they had no idea what I was talking about. Well, the term is French, and literally translated it means "mouth amuser". It's a small appetizer that's served to prepare the guest for the meal. I served Roasted Butternut and Sage Soup in little espresso cups with a swirl of cream and paired it with some tiny loaves that I baked- it was the perfect amount to warm everybody up and prepare the palette for the main course.
I would love to share my butternut soup recipe with
you, but honestly... I completely forgot what I did, when I did it and how!
I just made it up as I went along. Sometimes those end up being the best meals- the ones whose recipes are from the heart. I do however have a recipe for the mini loaves (Below). If you are
like me and don't always have time to bake everything from scratch- then simply
buy a basic dough from your nearest Spar or Pick n Pay and spruce it up with
some paprika, rolled oats and salt and pepper. Put the dough into mini silicone
loaf pans and bake at 190 degrees for 40-45 minutes.
Mini Loaf Recipe
This recipe has been
adapted from Jamie Olivers Basic Bread Recipe- see here
Ingredients
1 kg strong bread flour
625 ml tepid water
30 g fresh yeast, or 3 x 7g sachets dried yeast
2 tablespoons sugar
1 level tablespoon fine sea salt
Flour, for dusting
1 Beaten Egg Yolk
Rolled Oats for sprinkling
Salt, Pepper & Paprika
Method
Stage 1: making a well
Pile the flour on to a clean surface and make a large well in the centre. Pour
half your water into the well, then add your yeast, sugar and salt and stir
with a fork.
Stage 2: getting it together
Slowly, but confidently, bring in the flour from the inside of the well. (You
don't want to break the walls of the well, or the water will go everywhere.)
Continue to bring the flour in to the centre until you get a stodgy, porridgey
consistency – then add the remaining water. Continue to mix until it's stodgy
again, then you can be more aggressive, bringing in all the flour, making the
mix less sticky. Flour your hands and pat and push the dough together with all
the remaining flour. (Certain flours need a little more or less water, so feel
free to adjust.)
Stage 3: kneading!
This is where you get stuck in. With a bit of elbow grease, simply push, fold,
slap and roll the dough around, over and over, for 4 or 5 minutes until you
have a silky and elastic dough.
Stage 4: first prove
Flour the top of your dough. Put it in a bowl, cover with cling film, and allow
it to prove for about half an hour until doubled in size – ideally in a warm,
moist, draught-free place. This will improve the flavour and texture of your
dough and it's always exciting to know that the old yeast has kicked into
action.
Stage 5: second prove, flavouring and shaping
Once the dough has doubled in size, knock the air out for 30 seconds by bashing
it and squashing it. You can now shape it or flavour it as required – folded,
filled, tray-baked, whatever – and leave it to prove for a second time for 30
minutes to an hour until it has doubled in size once more. This is the most
important part, as the second prove will give it the air that finally ends up being
cooked into your bread, giving you the really light, soft texture that we all
love in fresh bread. So remember – don't fiddle with it, just let it do its
thing.
Stage 6: cooking your bread
Preheat the oven to 180°C/350°F/gas 4. Divide the dough into your greased mini
loaf pans. Scatter oats, paprika and some salt and pepper over the top and
gently brush each loaf with some beaten egg yolk. Place your loaves into the
preheated oven. Don't slam the door or you'll lose the air that you need. Bake
for 25-30 minutes or until cooked and golden brown. Once cooked, place on a
rack and allow it to cool for at least 30 minutes.


